First Event in Second Life

As Mayo Clinic (specifically our Center for Innovation) hosted its first event today in Second Life, it also was the first time I have attended a Second Life event. You can read about the event here on our Mayo Clinic News Blog, and I also have uploaded some screen shots to our Mayo Clinic Facebook Page.

If you haven’t experienced Second Life, here’s a brief video snippet from today’s presentation to give you a feel:

Second Life has a different value proposition as compared to the social media tools I have more strongly advocated. For instance, for an educational event like today’s lecture, it provides a neat way for people from all over the world to be virtually in the same room. I thought it was neat that we had room monitors available to help newbies like me figure out the controls.

Second Life is not a way to reach a large audience. There were several dozen people (or their avatars) in this event today, which I think made it quite successful. But it does seem like a good way to have more in-depth interactions than may be possible through Twitter chats, for instance. And for discussions of sensitive subjects and medical conditions, the anonymity of an avatar offers some value.

Back in 2007 there was a lot of hype about Second Life, and many organizations rushed in to have a presence there. I’m glad Mayo Clinic is exploring this through our Center for Innovation, and seeing what uses make sense for us.

I wrote a post about Second Life back in 2007 that was misunderstood as trashing Second Life, when that wasn’t my intent at all. My point was that organizations that had been considering spending on Second Life should think Facebook first. I think that’s proven to be wise advice: at the time Facebook had 40 million monthly active users, and since then has grown to 400 million.

But I still think Second Life is worth exploring, and as I said, I’m glad we have some people at Mayo Clinic who are seriously experimenting with it. I personally will probably not be a super frequent visitor because I have a lot of other things going on, but I’m keeping an open mind.

How about you? Have you visited Second Life? What do you think of it? How do you see it being applied?

Facebook 125: Creating Community in Your Facebook Group

A Facebook group is like a garden, to borrow an analogy from Chance, the Peter Sellers character in Being There. It will not grow properly without cultivation.

Because a group is so easy to create, billions have been formed. Facebook currently has 400 million active users, and the average user is a member of 13 groups. Do the math.

The vast majority of Facebook groups have precious little activity.

As a group administrator, you have tools at your disposal that the other members don’t have, and which are crucial to keeping the group vital and active.

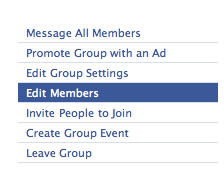
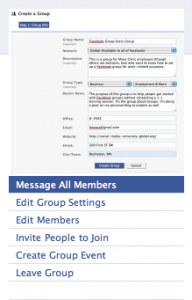
First, you can Message All Members by picking this in the left navigation:

This enables you to send a message to the Facebook Inbox of all group members. A good time to do this is when there is a Discussion Board topic or Wall post for which you would like their feedback…or a new video that has been uploaded, or a new event created.

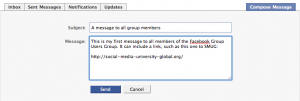
So when I created the Facebook Group Users Group, I used Message All Members to send this message (click to enlarge):

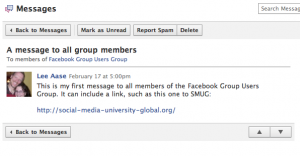
Which looked like this in my Inbox when I received it:

This is a way to keep your group top of mind among members. Don’t abuse it by sending too many messages; otherwise your group members will leave. But if what you are sending is meaningful and worthwhile to them, they will welcome it.

Your goal should be for the group to be useful to its members. If you are sending a message just to keep the group going, and not to help your members, that’s a sign you’re doing it for the wrong reasons. And your members will sense it.

Remember, the group doesn’t exist for itself; it exists for its members.

You also may want to Edit Members of your group to designate some of them as Officers or Admins.

Be careful with your designation of an Admin; these individuals will have the same rights with the group as you, the creator, do. But you may wish to have at least one additional trustworthy person as an Admin.

Officers, on the other hand, can be multiplied. By designating officers with any range of titles you can enable group members to find the person who may best be able to answer questions. In an academic program interest group, for instance, you may have someone other than the group creator designated as Program Director or Admissions Counselor. Or if you were to use Facebook as an online newsroom, you could indicate what specialty beats a particular staffer covers. In this way, a member can send a private inbox message in Facebook to a designated officer, such as a journalist identifying the staffer who covers the cardiology beat.

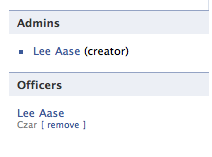
Then when you look on the front page of the group, your officers will be listed, so interested members or visitors can know which person they should contact.

I don’t know what I was thinking when I did this originally; I can’t believe I chose “Czar” as my office instead of “Chancellor.” I’ve since fixed that.

In my opinion, having an active group in Facebook requires an Admin who is committed to regularly adding content that is useful to members, and who takes time to reach out and remind members of the new content (without overdoing it and causing people to leave the group.)

What’s your experience? How else do you create community in a Facebook group?

Twitter + Facebook = Kidney Donation

Here’s an interesting story from the Minneapolis Star Tribune, which illustrates an interesting and unusual application of social media tools in health care and medicine:

Chris Strouth needed a kidney transplant. He’d been on dialysis for months after Berger’s disease (which he called “Harold”) wreaked havoc on his renal system. So he tweeted about it, casting a wide electronic net with a plea to anyone he was even remotely connected to online. He got an impressive 19 offers, and one match — casual acquaintance and Facebook friend Scott Pakudaitis of St. Paul, whose left kidney, “William the Conqueror,” was transplanted into Strouth in December. Both are doing well, and the rest is Facebook history.

Check out the rest of the story.

Facebook 120: Creating a Facebook Group

Groups enable Facebook’s 400 million monthly active users to congregate and interact in discussions related to a subject, even if they aren’t “friends” with all (or even any) of the other members.

Groups in Facebook are different from Pages and even personal Profiles.

  • Profiles are for individuals…for real people. These are the basic user accounts everyone from students to grandparents create. You cannot create a Group unless you have first joined Facebook by creating your personal profile.
  • Pages are for organizations, or brands. In our Mayo Clinic context, we have one Facebook “fan” page.
  • Groups are the means to create connections among people with common interests, and are the way to create communities in Facebook. The rest of this post will take you through the process of creating a Facebook group.

I established the Facebook Group Users Group as a way for people to get guidance on setting up Facebook groups. Please feel free to join it. In a moment, I will take you step-by-step through the process of setting up a group, using the Facebook Group Users Group as an example.

But first, here are some of the key issues you need to decide when setting up your group:

Should it be limited to one of your networks, or open to all of Facebook?

This is a different question than the Open/Closed/Secret one below. If you limit the group to only the Mayo Clinic College of Medicine network, for instance, only people with a Mayo.edu email address will be able to join. Once you decide, you can’t change your mind, so I generally recommend making it open to all of Facebook. You can still limit access by making the group Closed or Secret, but once you’ve chosen to limit to a network you can’t later make it more open.

Should it be Open, Closed or Secret?

  • An Open group is the easiest to administer, because anyone can join it without being invited or getting approval from a group administrator. If you want to build a group quickly and if confidentiality of information shared isn’t a concern, open is the way to go.
  • Anyone can see basic information about a Closed group (and can request to join), but wall posts, discussions and photos are limited to members. Group creators or administrators can invite their Facebook friends to join. If you have some need to limit access to the conversations and group membership, Closed is a good option. As administrator, you will get a Facebook message whenever someone requests to join, which you can approve or deny.
  • A Secret group is the most confidential option, but also the most difficult to form. The only way people can join is by being invited, because the group won’t show up in public listings or on anyone’s individual profile. To invite someone to the group, you need to be their friend in Facebook (or invite them via email through the group.)

One short-term option you can use is to start the group as Open or Closed, and then once everyone has joined you can switch it to Secret.

How to set up your Facebook Group

Note: Click any of the images below to see a larger version.

From your Home page in Facebook, click on the Groups link in the left column navigation:
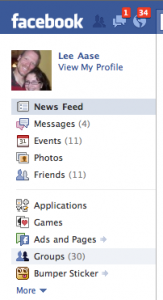
Then at the top of the page you will see a button that says “Create a Group.” Click it.

This will bring you to the first page of group set-up, for which I have inserted below the screen shot of the settings I used for the Facebook Group Users Group.
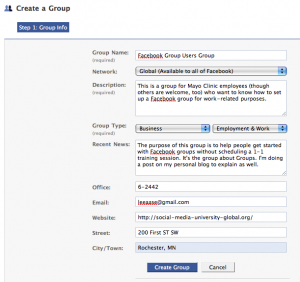
A few points:

  • Except in unusual circumstances, you will want to make the group “Global (Available to all of Facebook) under the Network setting. You can still manage who is allowed to be a member of the group via the Closed or Secret settings in the next step, but once you limit to a particular network you are forever barring people outside of that network from joining. If, however, you want a group to only be available to members from your workplace (or school), you could limit to one of your networks. But once you decide that, you can’t change it.
  • Take time to choose your Group Type and sub-type. With each of the Categories, there are different options for sup-type. Here is a listing of the Categories:
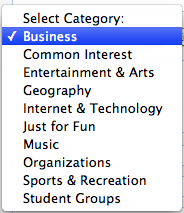
  • Choose a meaningful title and add a good description of the group. This will make it more likely that if friends of your group members see the group, they will find it interesting and decide to join.

When you click the “Create Group” button on the bottom of the first page, you will go to a second page that enables you to set options for who is able to post to the group’s Wall, or upload photos and videos. Unless you have a specific reason to be more exclusive, I recommend enabling anyone who is a member of the group to write on the wall and upload photos and video.
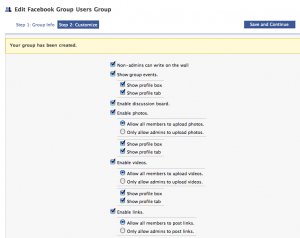
The goal is interaction, after all.

On this same page, you will be able to choose whether the group is Open, Closed or Secret (as described above.) Here is what that choice looks like:
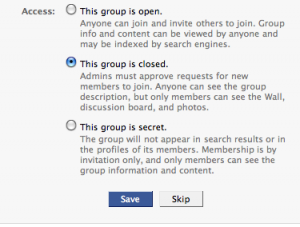
When you hit the “Save” button, you will be asked whether you want to publish a notification to the wall of your personal Profile and to your friends’ home pages. It will look like this:
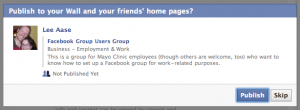
If you want the world to know that you have created this group so others will be encouraged to join, hit the Publish button. If you only expect to invite a limited number of people to join (as in the example of an online focus group or patient support group), hit “Skip.”

In Step 3, you get to invite your friends to join the group.

Just start typing their names (or you also can invite an entire friend list), and when their names show up you can click on their picture to select them. After you have selected all those you would like to invite (and added any message describing the group and why you invited them), you can send the invitations and go back to the front of the Group.

From there, you can upload a picture to represent the group, as you see below.
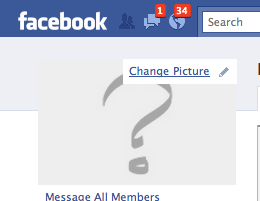
It’s a pretty straightforward interface; I decided for the Facebook Group Users Group to upload a screen shot of the first step in creating a group. The picture you choose should be meaningful for your group.
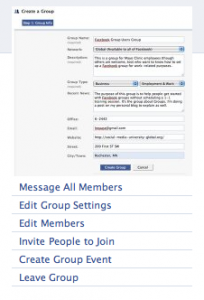
That’s really all there is to creating a group in Facebook. In a separate post, I will highlight some of the basic interaction steps within a group, and how you can further customize it to be most useful.

Facebook Revolution with SMUG on KTTC

I had a fun opportunity to be interviewed earlier this week as part of this story that ran on KTTC TV in Rochester Thursday night:

I also kind of broke my general rule about not initiating friend requests with females under 30 because Lauren Hardie, the reporter, mentioned SMUG in the story, and that she had some additional video of the interview with me on her Facebook page. So if you want to see that snippet, go see Lauren’s videos.